Monday, June 28, 2010
Pork Chops with Dijon Cream Sauce

Sunday, June 20, 2010
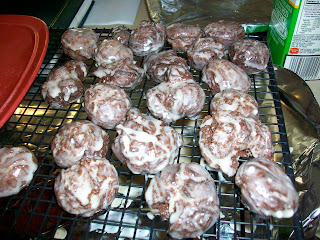
chocolate doughnut holes
I made these tonight because my family came up for the evening and I wanted to have a treat ready. Try them out! So good! They disappeared faster then I could glaze them.
The most important thing to know about this recipe is that like most cake doughnuts, it makes a very sticky, soft dough. This one was so sticky I actually added a couple extra tablespoons of flour, and still felt panicky as it wanted to stick to the counter. Don’t do that, panic, I mean. Flour your counter very well. Plop the dough down on top. Flour it well and gently pat-pat-pat the dough until it is flat. The less you disturb it and the more generously you flour your counter, hand and cutter, the less sticking you’ll have. If it gets disturbingly soft, put the shapes (and/or dough) on a parchment or waxed-lined sheet and pop them in the freezer for a few minutes until they’re easy to pick up again.
My changes were to adjust the flour a bit, tweak a couple ingredients, add additional instructions, weights and I used a different glaze.
Yield: 4 dozen 1.5-inch holes. I halved the recipe and used a 1.25-inch cutter so I had a little over 2 dozen.
2 3/4 cups (12 3/8 ounces or 352 grams) all-purpose flour
1 cup (3 ounces or 90 grams) unsweetened Dutch-process cocoa
2 teaspoons (about 3/8 ounce or 10 grams) baking powder
1/2 teaspoon (about 1/8 ounces or 4 grams) salt
4 large eggs
1 1/2 (10 5/8 ounces or 300 grams) cups sugar
1/3 cup (2 7/8 ounce or 84 grams) sour cream (what I used) or buttermilk or you canmake your own
3 tablespoons (1 1/2 ounces or 42 grams) butter, melted and cooled a bit
Your fat of choice for frying (solid vegetable shortening or canola, peanut or vegetable oil are popular choices)
Whisk flour, cocoa, baking powder and salt together in a large bowl. In a medium one, whisk eggs, sugar, sour cream or buttermilk and butter. Stir wet ingredients into dry until well blended. Chill batter until cold, at least 1 hour and up to 3.
Flour your counter generously (see Note up top) and scrape dough onto it. Flour dough. Flour your hands. Gently pat dough out until it is 1/2-inch thick. Dip a 1 1/4 to 1 1/2-inch round cutter into a dish of flour and cut rounds from dough. Pat scraps of dough together and cut them again. If your dough or doughnut holes have gotten too soft to easily pick up, put them on a floured or parchment or waxed paper-lined tray and put them in the freezer for a few minutes, until they’re firm enough to gently handle again.
Prepare your fryer or fill a 5 to 6-quart with 4 inches of oil. Heat to 375°F (190°C). You can fry 6 to 12 doughnut holes at a time, about one full minute on each side. The trickiest parts will be visualizing when the doughnuts are done — since they’re chocolate, the color change will be subtle; I suggest practicing with scraps of extra dough first — and keeping your oil at an even temperature, if you’re not using a deep-fryer. Make sure you bring the oil back to 375°F after each batch.
Drain doughnut holes on a stack of paper towels. Once cool, roll in glaze (below) and let drain and dry on cooling racks.
I understand that these should keep for a day or two. We’ll probably never find out.
Full-Sized Chocolate Doughnuts: You can use this same dough to make 3-inch round doughnuts (with a 1-inch hole removed from the center). Because the dough is fragile, I definitely recommend popping the shapes in the freezer to firm up a little before you drop them in the fryer. You will want to fry them for 2 minutes on each side. It should yield about 16 3-inch doughnuts.
Chocolate-Stuffed Doughnut Holes: Why didn’t I think of this before? I bet awesome things would happen if you pressed a tiny piece of chocolate into the center of your unfried doughnut hole. Let us know if you try it in the comments.
Doughnut Glaze
8 ounces powdered sugar
3 tablespoons water, milk or buttermilk (what I used, highly recommended)
1/8 teaspoon vanilla extract
Whisk together until smooth. If you need it thinner, add more water, milk or buttermilk, a few drops at a time.

grandma's buttermilk pancakes
 **So in my family, we're all about cheese pancakes. I know that sounds crazy but they're actually very delicious. Cut up little cubes of cheese, then, toss them on top of your pancake batter after you've poured it onto the hot skillet. Then cook and flip like normal. You can see my cheese pancakes in the picture below on the right. Serve with syrup and/or peanut butter.**
Monday, June 14, 2010
Baked Italian Sausage Rotini and Bruschetta


lemon garlic tilapia and cool pasta salad


